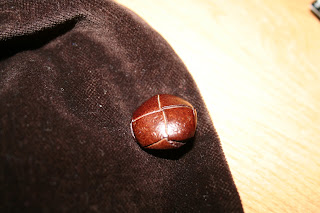
So, sewing on a button seems easy. BUT, when sewing on a button with a "Shank" (read: a button with a metal thing on it with a hole on the end....vs. a button with 2-4 holes drilled through it) (you can see what I am talking about in the pictures below), and it is on a garment that is worn quite often, it requires a couple special little tricks, or else the mending job will not last. These buttons are found most often on jackets/blazers/etc.
Without further ado, this is how you sew on a button with a shank on it (or how I do it...you may know a different way!) (Note: this project does not require a sewing machine! Yay!)
Tools needed: the button that escaped, scissors, needle, thread
1) Thread your needle with thread that will match the jacket, or that will match the thread used on the other buttons. I double thread the needle, and tie a knot at the end (or two knots), like so (you can click on any of these images to make them bigger :)):
2) Trim the area where the old button was, if need be (trim old threads, etc.)
3) Bring the thread up through the back of the fabric, and up through one side of the button's shank, and pull taught like this:
4) Put the needle back down through the fabric, and bring it back up to the front, through the shank again, keeping the stitch small. DO NOT pull the button TIGHT! It needs a *little* bit of space between the bottom of the button and the top of the fabric, or else it will be hard to button it up. This is shown in the pictures.
5) Do this several more times so that there is a lot of thread anchoring that little guy in. This is what it should look like after steps 4) and 5):
6) Now, the trick that helps a button like this LAST: wrap the thread around the outside of the thread that is anchoring the bottom of the button to the fabric...and....
7) Continue to wrap the whole length of the thread that is in that little space. This is what it should look like after step 6) and 7). You have to look really close to see the winding (note: sorry picture isn't more detailed. I needed 4 hands to take a picture of me winding it...but alas, I was only born with 2 hands...):
8) Put the needle through to the back of the fabric one more time, knot it twice on the back side, and cut it off.
9) DONESIES!
And my beautiful J. Crew Bella Jacket is back to it's old happy self...
I've wanted the dark blue version of this jacket for years, but I guess this will have to do for the next....346 days. Sometimes fixing up your older clothes makes them feel like new again, and can really stave off the desire to pop onto the internet and find something newer! Happy buttoning to you and yours:)


That is one fine looking jacket! I impressed you stave off the clothes itch!
ReplyDeleteHaha:) Thank you! I believe that everyone in the world should own a J.Crew Bella Jacket, but maybe that is a tad superficial:)
ReplyDeleteA tip I heard years ago about sewing on buttons is to slip a thin toothpick between the button and the fabric, then sew around that. It forces you to leave the gap you were talking about (for those of us who can't resist pulling tight) and then can be slipped out before you wrap your thread.
ReplyDeleteAnother tip I heard was to dab a little clear nail polish on the backside of the thread when you first buy the garment. It helps keep some of the buttons from coming off in the first place.
Thanks for sharing those tips, Heather H.! I've never used the toothpick trick, but I when I machine-sew regular buttons on a shirt or something, I put a sewing pin between the fabric and the back of the button for space. Also, good tip on the nailpolish! I'd just be afraid that I'd spill it on my garment, being the klutz that I am! Hahaa:)
ReplyDelete