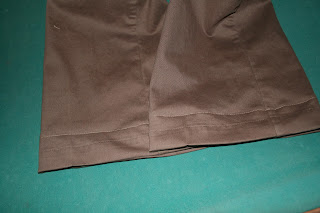
Some things I learned when I was a professional seamstress:
1) People are inherantly lazy about their clothes. Even seamstresses
2) People do not want to pay to have hems done, but they do not want to do it themselves
3) People do not realize how easy it is to do their own hems, and how little time it takes
4) People would rather walk around with their pants dragging on the ground till the pants fray than hem them.
Well, hems are a big issue for many...the short, the tall, the people who wear suits, even kids. And pant length is an issue for me too. I hate when my pants are too short, and I hate when my pants are too long. But, hemming is SO easy to do. And if you learn how to hem you can really expand your wardrobe.
So, as part of my challenge I am trying to get the wardrobe I have in tip-top shape so that I have a large "palate" to work with (see how I tried to sound fancy there? I think it worked). I got these pants for, like, $3 about 3 months ago. They are just too long. I have a weird inseam...33". Too long for regular pants, too short for tall pants. So, they have been sitting around, looking pretty and doing nothing. I decided they need work, and that I'd give some hem tutorials here.
Just so you know...I'm only gonna show you the right way to do something. You'll see a lot of tutorials on quick and easy hems/alterations/etc. That's not how I roll. I do it the right way, or DIE TRYING! Well...that may be a bit dramatic..this takes a little longer than using hem tape, or (god forbid) duct tape to hold up a hem, but it lasts longer too, and is really quite easy.
Here goes... how to hem a pair of CASUAL pants (dress slacks are totally different...but I'll get to them another time...)
1) ALWAYS wash your pants before you start! Whether they are old or new (especially if they are new though), WASH them. Older pants stretch out between wears, making them seem longer. New pants often shrink up a lot in the inseam upon first wash. To illustrate this point, I measured these pants before their first wash:
And after their first wash:
(Just playing a little pants pool...nevermind...)
You can see the length difference. They lost about 3/4" to shrinkage in the wash! So, never skip this step.
2) Try them on WITH SHOES, and be realistic about what shoes you will wear. Personally, I always am like "Oh, I should keep them longer in case I wear heels every day and look fabulous!" But then my regular regiment of flats sneaks in and I don't wear the pants because they are too long. I tried to take a picture of the hem with me trying them on and I just couldn't get it right. I need a photographer...
3) Pin them to the appropriate length. If you are alone, do it in a mirror. If you are with someone, get them to pin it while you stand so that the length stays the same. Either way, check it in the mirror, while standing at full length, and make sure they are pinned where you want them to be pinned.
a) With flats, this would be 1/4"- 1/2" from the bottom of the shoe in back (the exact length depends on your personal taste).
b) If you are hemming your pants to wear with heels, the pants should come about halfway down the heel, if not a little further (again, it depends on your personal taste).
You are just pinning to see how much you need to bring the hem up, that's all, so it doesn't have to look brilliant. I usually just pin in a couple spots on 1 leg. However, if your legs are drastically different lengths, you should pin them separately.
Here are my pinned pants:
4) Next, you need to measure with a ruler to determine the actual amount you need to bring them up. I have a special magical sewing ruler (well, it's special at least...), but you can use any ruler. Just make sure it is a hard ruler, not a soft measuring tape.
This is what mine looks like when I am measuring it:
TAKE NOTE of the amount you want to remove! I mean seriously, write it down. It is easy to forget until it is too late in the process. Once you've measured and written it down, you can take the pins out and get ready for the next step.
5) Next is the step that most people who sew hate more than anything. But, some people like it. With most industrial hems, you need to rip the hem out before you can re-measure it and do it the right length. To do this I use this awesome little tool (you can find it at any fabric store, or even in WalMart's sewing section):
So, what you do is that you carefully tear through the thread all the way around. Make sure to not catch the fabric while doing this. It will look something like this:
You can also do this on the inside of the seam, instead of on the outside, that looks something like this:
This takes awhile, but doing this process ensures that your hem will look really professional, hang well, and be good to go forevermore. I also like to pick the little thread remnants off of the hem just so that I have less to do later.
When you're done tearing out the hem, it will look something like this...:
And here's a little something I made out of the extra thread.....HAHA!!!:
6) After the hems are ripped out, go look up how much you said that you needed to raise the hem. Mine was 3/4". So, I am going to mark on the pants 3/4" from where the bottom of the pants was. I use tailor's chalk (it is actually more like a wax..and it disappears when ironed), but you can use just a nice sharp pencil, or any other marking tool from the fabric store. I do not recommend using pens or permanant marker! If you are hemming really dark pants and don't have tailor's chalk, you can use stick foundation, blush or concealer in a pinch.
a) I start by finding the crease, and laying out the pants on an ironing board:
b) Then, I go around by halves. I mark one half of one leg, flip it over, and mark the other half. I use a ruler as I go and I make small dashed lines where I am measuring (in this case, I make small dashed lines 3/4" from the OLD bottom of the pants).
7) Now, need to re-fold the hem. This can be tricky to explain. In these pants, the hem was doubled over, plus a small lip of 1/4". So, I will probably do that again.
Original hem all laid out...you can see the deep crease where the original bottom of the pants was, and then you can see another 2" below it, with another crease, and then about 1/4" with a raw edge at the end.:
So, what I am going to do is trim 3/4" from the VERY end of this whole hem thingy, and fold it the way it was originally folded. So, I am gonna measure 3/4" and mark it...
And then cut off below that point. I am measuring 3/4" because that is how much I am raising the hem. If you were raising it 1/2", you would cut off the extra 1/2". If you leave the extra, it adds too much weight at the bottom of the pants.
8) When I am done with that step, I iron the pants where the NEW bottom will be (the first line we marked). I iron them under.
9) When I am done ironing, I need to pin the pants before I sew them. Pinning helps hold the fabric in place. You can get pins at any fabric store. I like to put a pin every 1.5" or so, but it is just something you do by feel, you don't have to measure or anything.
So, first step before pinning is to get the fabric in place for when you want everything to be. So, I am going to turn the pants inside out, fold 1/4" under, just like the first hem did:
Then I am going to fold 2" under.
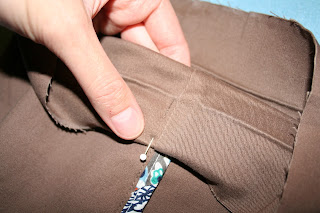
Then I will pin all of that by sliding a pin through all of the layers, like so:
Now...you're ready for the big time...
9) Sew those bad boys! Well, there's more to it than that. If you have a sewing machine, that is very helpful. I assume you know how to thread it and get it ready to sew. If you are doing this by hand, get a long, strong, thick needle and wear a thimble.
Get a thread that matches the original hem in the pants. Buy it in advance when you have the pants with you, preferably. I have a lot of thread on hand, so I just use what's in stock that matches the original closely.
When you sew, always start by going three or four stitches forward, and back stitching 3 or 4 stitches. This helps anchor the stitches to that none of them come out when worn or washed.
You need to make sure you are sewing at the depth where you want your hem. I want mine 2" deep so, I line mine up with a point on the sewing machine (mine has a measurement grid) where that depth will be achieved. You can also measure the distance you want from the needle and put a little piece of tape there to use as a guide. Here's mine:
And I keep an eye on the top to make sure that all the layers are being stitched through.
When I finish, I also backstitch 3 or 4 stitches
And trim all threads right at their base:
NOW YOU ARE DONE!!!!
You can wear these, or iron them and then wear them, or just put them up on your wall as a great accomplishment. If you are concerned about there being marks from the previous hem, a few washings and ironings will take care of it.
Now you know how to properly hem a pair of casual pants! If you have any questions, or if I explained anything poorly (which is ENTIRELY possible! Sorry in advance), please leave a comment and I will get back to you about it.
Thanks for reading:) Have a good one...and never forget that you can tweak your existing wardrobe that it is SO AWESOME that you don't even want new clothes! (I hope...)
Oh, and I'm not a big fan of drinking and sewing (trust me on this one...), but you've definitely earned at least one glass of wine at this point. Cheers!:)


Just started reading the blog, and have read the back posts. I think you're doing something really clever that we could all use doing. I'd love to learn to sew, my mother always did. I just never learned. I'm hoping some angel hears my "I need a sewing machine" call this Christmas and answers!
ReplyDeleteRaven, you are too kind, thank you for reading:). Maybe as the blog progresses I could do a sewing machine give-away promotion at some point...now that would be awesome. Till then, I hope you get the chance to learn! Thanks for reading:)
ReplyDeleteGreat job on those pants, Honey, and very nice pictures! A very professional job, indeed!
ReplyDeletegreat explanation on heming. Now I might actually tackle some of those pants that are starting to fray from my stepping on them!
ReplyDelete